
How to Fit Drip Edge Trim Properly

A drip edge that sits proud, rattles in the wind or lets water track back onto the fascia usually comes down to one thing – it was fitted in the wrong order or fixed without enough care. If you are working out how to fit drip edge trim, the good news is that the job is straightforward once you understand where the trim sits in the roof build-up and how it should manage water at the edge.
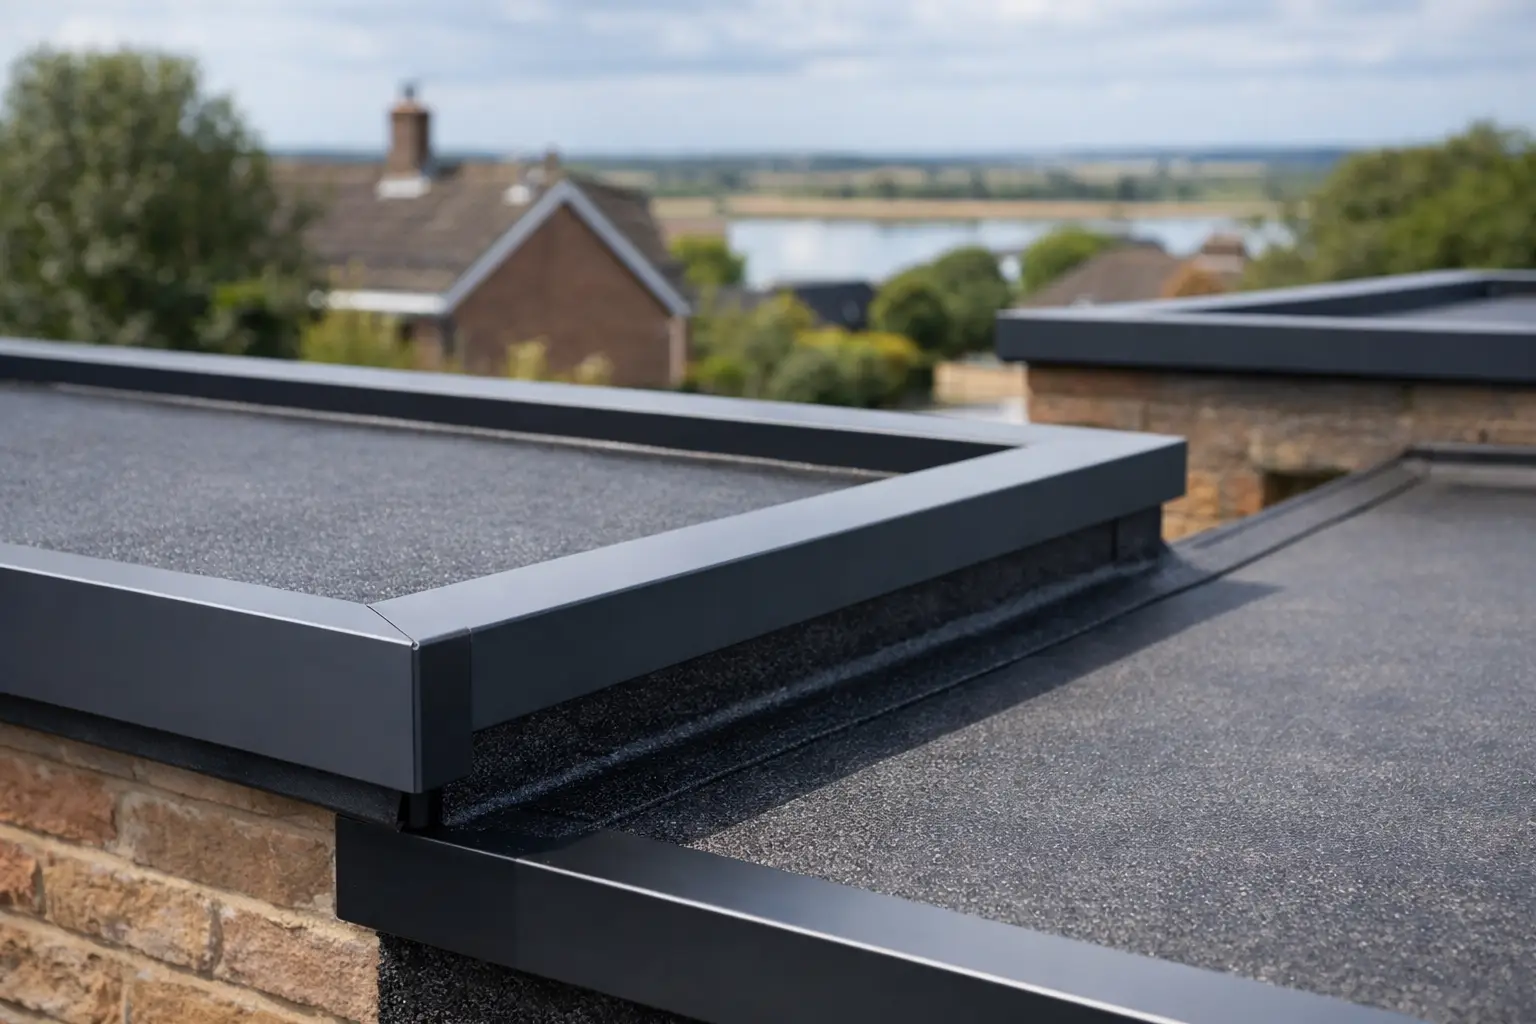
On flat roofing projects, drip edge trim is not just there to tidy up the perimeter. It helps direct rainwater away from the roof edge, protects the underlying deck and fascia, and gives the waterproofing system a proper finished termination. Get that detail right and the roof performs better. Get it wrong and even a good membrane or felt system can be undermined at the edge.
What drip edge trim does on a flat roof
A drip edge trim is fitted to the roof perimeter where water needs to discharge cleanly from the surface. Its profile projects water away from the building so it does not cling to the underside of the edge and run back towards the fascia or wall. That matters more than many people realise, especially on exposed roofs where repeated wetting can shorten the life of surrounding components.
It also creates a neat, consistent line at the roof edge and supports the finished look of the system. On domestic jobs that may be the part the customer notices first, but for installers the practical role comes first. A properly selected trim helps the roof shed water as intended and gives the edge detail enough strength and rigidity.
Before you fit drip edge trim
Start by checking that you have the correct trim for the roof system and edge detail. Flat roofing trims vary by profile, size and intended use, so it is worth confirming whether you need a drip trim, an upstand trim, a kerb edge trim or a different perimeter detail. Using the wrong profile can leave you trying to force a fixing method that was never meant for that location.
You also need to check the substrate condition. The roof deck edge should be sound, dry and straight. If the deck is swollen, uneven or crumbling at the perimeter, the trim will not sit properly and the finished line will show every defect underneath. Sort the edge out first rather than trying to pull the trim into shape with fixings.
Measure the roof perimeter carefully and allow for joints, corners and wastage. If you are fitting several lengths, plan the sequence before you start so the overlaps or joint pieces run neatly and do not interrupt water flow. On a simple rectangular roof this is easy enough. On more awkward layouts, a few minutes of planning saves time later.
Tools and materials you will usually need
For most installations, you will need the trim lengths, matching jointers or connectors where required, suitable fixings, a tape measure, pencil or marker, drill or driver, snips or an appropriate saw for cutting trim, and sealant if the system calls for it. Some systems also require specific end caps, corners or compatible membrane accessories.
Always check the manufacturer’s guidance for the particular trim and roofing system being used. That is especially important with flat roofing products, because the fixing centres, joint details and membrane termination method can vary from one system to another.
How to fit drip edge trim step by step
The first step in how to fit drip edge trim is to set out your starting point. Offer the first length into position at the roof edge and make sure the front face sits true. The horizontal flange should sit flat on the deck without rocking, and the drip section should project sufficiently to throw water clear.
Once you are happy with the position, mark your fixing points. Many trims are fixed through the top flange into the deck at regular centres. Keep the spacing even and follow the product guidance rather than guessing. Too few fixings can leave the trim loose in windy conditions, while over-fixing can distort lighter profiles.
Drill or fix the first length in place, checking alignment as you go. It is better to fix progressively and keep rechecking the line than to secure one end and force the rest. If the deck edge is straight, the trim should sit naturally. If it does not, stop and find the reason before carrying on.
When joining lengths, use the correct joint piece or allow the recommended gap if the system is designed that way. Do not butt trims tightly together unless the specification says to. Metal trims can expand and contract, and allowing for movement helps prevent buckling or opening at the joints. Keep every joint clean, level and properly seated, because any step in the run will be obvious and may interfere with drainage.
At corners, cut and form the trim as required or use purpose-made corner pieces if available for the system. Factory-made corners usually give the cleanest finish and reduce the chance of weak points. If you are fabricating corners on site, take your time. Rough cuts and poorly folded sections stand out immediately and can create awkward points for the waterproofing to finish over.
Fitting drip edge trim with felt or membrane systems
The trim has to work with the waterproofing, not fight against it. On felt roofs, the trim is generally fixed in place before the felt is dressed and bonded over or terminated according to the system detail. The aim is to create a continuous weatherproof edge that still allows water to discharge cleanly from the front of the trim.
On single-ply or other membrane systems, the exact order can vary depending on the product and edge detail. Some systems use a compatible perimeter trim with a separate membrane termination, while others are designed for the membrane to bond directly to part of the trim profile. This is where product compatibility matters. A trim that looks similar is not necessarily right for the system being installed.
If you are mixing products from different ranges, be careful. The finish may look acceptable on day one but the long-term performance at the edge can suffer if fixings, coatings or bonding surfaces are not intended to work together.
Common mistakes to avoid
The biggest mistake is treating drip edge trim as a finishing extra rather than a functional part of the roof edge. That usually leads to poor positioning, uneven fixings or a last-minute fit after the main waterproofing has already been laid. The edge detail should be planned from the start.
Another common issue is insufficient projection. If the trim does not throw water clear enough, rain can run back onto the fascia or wall face. The roof may still appear watertight, but over time the surrounding area shows the effects.
Poor jointing is another frequent problem. Uneven joints, no allowance for movement and badly cut corners all make the installation look weaker and can create points of failure. A clean edge run is usually the result of careful measuring rather than speed.
Finally, do not overlook the fixings. They need to suit the substrate and hold the trim securely without damaging the profile. If the deck edge is weak, changing the fixing pattern alone will not solve it.
When it depends on the roof detail
Not every flat roof edge is identical, so there is some judgement involved. A small domestic extension with a straightforward perimeter can often be trimmed quickly with standard lengths and corners. A larger roof, an exposed site or a detail near an outlet may need more thought around expansion, water flow and the relationship between trim sections.
It also depends on the finish expected. Trade installers may be balancing speed and durability on a maintenance job, while a homeowner may be far more focused on the visible line from ground level. In both cases the trim still has to perform, but the level of finishing detail may differ.
If you are unsure whether the trim profile is right for your roof build-up, ask before ordering rather than adapting something on site. That is usually faster, cheaper and gives a cleaner result.
Final checks after fitting
Once the trim is fixed, walk the edge and inspect it from more than one angle. Check that the line is straight, joints are consistent and the drip section is clear to discharge water. Make sure there are no raised corners, sharp cut edges left exposed or sections sitting away from the deck.
It is also worth checking how the edge looks in relation to the rest of the roof finish. A well-fitted drip edge trim should look deliberate, not forced into place. On most jobs, that neat perimeter line is a good sign that the roof edge has been treated properly.
If you are buying materials for a new roof or a repair, choosing trade-quality trims and compatible accessories makes the fitting process simpler. Quality Roofing Supplies Ltd works with customers who need reliable products without unnecessary complication, whether that is for a regular installation programme or a one-off domestic job. The right trim, fitted properly, is one of those small details that does a lot of heavy lifting.
Share This Article
Follow Us
Latest Articles
August 8, 2026

August 6, 2026

August 4, 2026
